Top 12 Permanent Makeup Tips of 2021!
The Permanent Makeup industry is constantly changing and evolving, so as Permanent Makeup Artists we need to keep up to date with the latest trends, treatments and techniques to stay at the top of our game.
We share the best Permanent Makeup tips from the leading PMU Artists on the ID Liner Pro PMU Instagram all year round, but here are the 12 top Permanent Makeup tips of 2021 - as voted for by you!
12. How to use the ID Liner Pigment Cleanser - Jasmine Diebelius

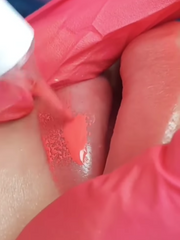
"The Pigment Remover removes all the staining that you get when you're tattooing. How I use it is I dampen some cotton pads then I spray this product onto the cotton pads and obviously use it during the treatment. Get some - it's really good and all your clients will comment on how amazing it smells."
Use 'JASMINE10' for 10% off our Pigment Cleanser!
11. How to correctly match up your hand and machine speed when creating shaded pixels

A quick and easy way to ensure your machine and hand speed match before you start working on your client:
TIP 1: Create Your Lines -
Take your ReelSkin, handpiece and needle of choice and start shading back and forth creating several lines in a row.
TIP 2: Check Your Pixels -
Count how many pixels you have created - You should aim for 7 to 9 dots in a row from the start to the finish of your pass.
10. Stefanie's 5-step process for the perfect Winged Eyeliner
 ID Liner Ambassador (and Eyeliner Queen!) @stefaniepmu takes us through her 5 step process to create the perfect Winged Eyeliner look!
STEP 1 - Pre-draw: Mapping out the shape of the liner to suit the client's eye shape and desired result.
STEP 2 - Etching: Tattooing the outline - a crucial step to create a crisp, neat finish!
STEP 3 - First Pass: Filling in the liner, staying within the outline you have mapped out.
STEP 4 - Layered Shading: Where you can begin to smoke the liner out, working lightly just above the crisp line you have created.
STEP 5 - Winged Liner: At this stage, you should work on defining the wing and perfecting the liner!
9. The three-way stretch
 The key to achieving a proper stretch is to flatten the skin, stretching in 3 opposite directions.
1. The hand you stretch with should be placed along the client’s forehead, pinning down the skin. Using your thumb and middle finger begin to stretch the skin in opposite directions. These two fingers form two of the 3 points.
2. At the same time, the little finger of the hand you hold your device in must stretch in an opposing direction, often downwards away from points one and two to complete the 3-point stretch.
3. When you feel like you have stretched enough - stretch a little bit more! The flatter and tauter the skin the cleaner your strokes and shading will be!
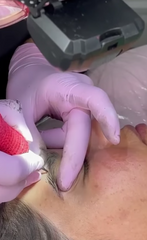
8. The secret to successfully implanting pigment into the lips
 French Permanent Makeup Artist @beka_dermo shares her secrets to successfully implanting pigment into the lips.
HER STRETCH: Using her thumb and index finger she creates a 'V' shape before pulling her fingers away from each other. Her pinky finger is resting just below the lip allowing her to create a '3-way stretch'. This creates a flatter, smoother surface allowing her to deposit pigment effortlessly!
HER TECHNIQUE: She uses a gentle Whipshading technique, lightly whipping back and forwards using long strokes to build up the colour in the superficial layers of the skin.
HER TOOLS: She uses the Defenderr Diamond Device and Defenderr cartridge needles. Using the highest quality tools and needles provides effortless working and will help keep trauma to lips at a minimum.
PRO PERMANENT MAKEUP TIP: Every Artist has a different preference when it comes to needle selection. If you are unsure where to start, we recommend a 33/01/RLMT for the lips. The 33/03/RLLT can then be used to complete shading on larger areas!
7. Colour-Coded Brows
 ID Liner Ambassador and multi award-winning Artist
@hanakellydelineate uses a colour coding method to map out her brows - utilising black, blue and red pre-draw pencils to distinguish between the different strokes she wants to create.
ID Liner Ambassador and multi award-winning Artist
@hanakellydelineate uses a colour coding method to map out her brows - utilising black, blue and red pre-draw pencils to distinguish between the different strokes she wants to create.
HOW:
BLACK: Use to identify the spine of your brow and create your key guidelines/the strokes that form the base of your brow
BLUE: Use to map out the strokes that you will weave through the base of your brow to start to create a fuller look
RED: Use to fill in the sparse areas that remain with softer strokes
WHY:
1. Colour-coding the strokes like this means that you have mapped out every single brow hair, making the tattooing process quicker as it acts as a complete stencil.
2. The colours indicate how many passes each stroke needs. For example, the blue and red strokes are softer and will need fewer passes. This visual reminder will help you do that.
3. You are MUCH less likely to make mistakes with the depth and placement of your strokes when your brow is mapped out this way, giving you more confidence and your clients the best results!
6. Let's Talk Microblading!
 One of our ID Liner Trainers and Microblading Experts shares their top tips on how to create the perfect brow.
• How to perfect those first few strokes
• The all-important transition stroke
• Reinforcing your hairstrokes!
We offer world-class Microblading training at the ID Liner Academy.
5. What is the difference between Carbon & Oxide Pigments?

Carbon-based pigments are thin in viscosity and their molecule size is 10 to 20 times smaller than oxide-based pigments. This helps them glide into the skin very easily. However, because of this they are much more likely to migrate.
Oxide-based pigments have much larger molecules and are similar to traditional tattooing pigments. They generally retain their colour better over time and are less likely to migrate in the skin.
Working with both Carbon & Oxide pigments requires skill and patience - the eyes are a tricky area to work on due to their location and the delicate, thin skin.
Let's delve deeper into our top tips to help you achieve the BEST eyeliner result for you and your client!
- Lower the speed on your machine and gradually turn up the power if needed.
- Throughout the entire procedure you should remain light-handed. If you are too heavy you will increase the likelihood of migration.
- Gently stretch the skin so it isn't lax. Failure to stretch will make the needle bounce off of the skin and won't deposit any pigment!
- Tattoo only at a 60-90 degree angle - use this video for reference if you are struggling to get your angles correct!
- Use a larger needle configuration which will help you deposit more pigment over a greater area. Larger needles in a grouping cause less trauma to the skin, which is essential for the eye area!
4. How to adjust your technique to achieve even saturation across the lips
 Unlike brows, lips can be more difficult to tattoo due to the different areas of skin. The texture and thickness of the different areas mean you need to adjust your stroke technique in order to achieve the best results! Here's how...
Center of the lips:
• Turn up the speed up on your power supply
• Adjust your strokes so that they are longer
• Use a whipping motion, tattooing towards yourself
• Utilise your 3-way stretch and ensure it is tight!
• Pigment retention is never as good in this area - to counteract this use a deeper pressure
• Allow time for more passes in this area so you can deposit more pigment
Outer edge of the lips:
• Use a slower speed/turn down your power supply
• Use a light hand for delicate strokes
• Adjust your stretch so that is slightly laxer (but still tight enough!)
• Use a light pressure
• Perform fewer passes in this area - this is important as you want to maintain a soft border. Overworking the lips here can result in you losing the shape or creating a harsh border.
3. What is Blanching?

Blanching occurs when the skin becomes white or pale in appearance, and this can occur after applying topical anaesthesia such as EMLA.
Why does it occur?
The exact causes of blanching after the application of topical anaesthesia have not yet been fully clarified. However, it is thought that the active substances cause vasoconstrictive effects (the narrowing or constriction of blood vessels).
So, when something blanches, it typically indicates a temporary obstruction of blood flow to that area. This causes the colour of that area to become pale relative to the surrounding skin.
You can test this on yourself if you press gently on an area of your skin, it likely turns lighter before resuming its natural colour.
Is it normal?
In a study of 50 participants, 33 cases (66% of people) experienced blanching after the application of topical anaesthesia - making it very common! Researchers found the effects to be temporary with all visible signs of blanching disappearing in less than 3 hours in all cases!
PRO PERMANENT MAKEUP TIP: Always follow the instructions from your topical anaesthetic provider and never exceed the recommended amount of application time - even if you have an overly nervous client!
Always reassure your client that the effects should wear off after a couple of hours and it will not affect the colour of the Lip Blush - even if it looks like it post-procedure!
2. How ID Liner Trainer and WORLD-CHAMPION @limitlesspmu creates her signature Hyper-Realism Brows!
 @limitlesspmu creates intricate strokes in a bespoke pattern to seamlessly blend the client's existing brow hair with the new hairstrokes to create a fuller, fluffier brow.
- Defenderr 33/01/RLMT Cartridge Needle
- Mag Color GOLD Brow Pigments:
• Dark Brown (Castanho Escuro)
• Intense Dark Brown (Escuro Intenso
PRO PERMANENT MAKEUP TIP: When creating Hyper-Realism Brows it's important to think about the value of tone and how this differs throughout the sections of the brow - the strokes should always build in intensity towards the middle to create the most natural look!
1. The perfect lip stretch
 Lip tissue can wrinkle easily and is sometimes laxer than other areas of the face, which is why it's so important to master the perfect Lip Blush stretch early on!
'The Scissor Stretch' is the easiest way to ensure you are stretching your client's lips effectively, and this technique will help you create a flatter, smoother surface allowing you to deposit pigment effortlessly!
TIP 1: Using your thumb and index finger create a 'V' shape and place it onto the area of the lip you are about to work on.
TIP 2: Gently begin to stretch the skin by pulling your two fingers away from each other. When the skin looks taut and smooth - stretch a little further! You will then be ready to start shading.
TIP 3: You should readjust your fingers frequently to ensure that you are continuously stretching and not allowing the skin to go lax.
Following these steps will help ensure you get an even and saturated deposit of colour!